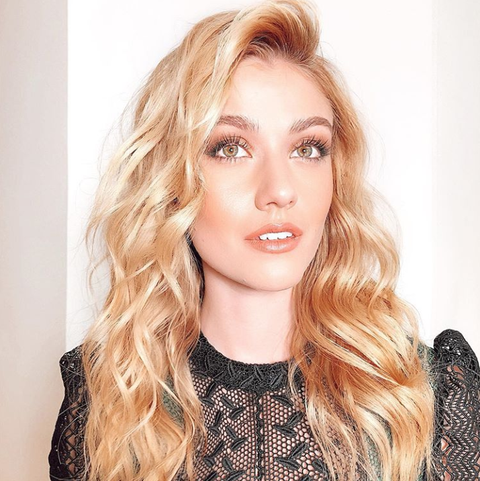
Courtesy of Justine Marjan
Achieving curls that look lived-in, natural, and (dare I say it?) "effortless" is not easy. The first step to getting it right, however, is to use the proper hot tool: A flatiron. Yes, you can get perfect curls by using a straightener. And, if you get the technique right, you'll never be at risk of having cheesy curls that look ready for a high school prom in the early aughts.
"I think the flatiron gives you so much more of a natural beachy look as opposed to a curling iron. It looks cooler. It's edgier,” says celebrity hairstylist Justine Marjan, who works with Kim Kardashian, Ashley Graham, Olivia Culpo, and Katherine McNamara (whose curls you see above were, indeed, created solely with a flatiron).
She tells ELLE.com, "People don't realize the effect that you can get with a flat iron. If I could only have one iron in my kit, I would definitely have the GHD Platinum Plus Styler because I can get a sleek look or a voluminous look, wavy or curly."
Read on for more key tips for curling your hair with a flatiron, below.
Get to know the different techniques.
The Slide Technique
"You would grab a one inch section, clamp the hair at the root, and then rotate the iron as it slides down the hair," Marjan says. "With this, you just want to make sure that your grip is not too tight, so that the iron doesn't get stuck on the hair. You want it to be able to easily slide down the length of the hair in one movement."
The Pressing Technique
"You would grab a one inch section, and then you would push the hair through the iron in the shape of an S-wave as you gently open and close and press the iron against the hair,” she explains. "You kind of 'stamp' the iron on the hair."
The Doorknob Technique
This one may take a few tries: "You grab the iron, grab a strand of hair, rotate your wrist in one direction so you're creating a C-shape as you drive the iron down the hair. Then you would release the strand and then reinsert the iron, and rotate your wrist in the opposite direction," Marjan says. What you get is more between a wave and a curl—and it all depends on your wrist movement. "Think of your wrists turning a doorknob, turn it one way then turn it the other way. That's as much motion as you should do in your wrist."
Don't put the heat on too high.
"It's definitely a myth that the higher the temperature the better for your hair," the hairstylist warns. "The higher the heat, the more it will blow out the cuticle layer of your hair, meaning your curls or waves will not hold as long." Lower heat—365°F is the "ideal" temperature—is especially better for color-processed hair. Go even lower for super damaged hair.
Work in one-inch sections.
This works for pretty much everyone, but if you have finer hair you'll want to grab bigger sections, and if your hair is thicker you'll want smaller sections.
Pay attention to how you prep your hair.
"While blow drying, use a mousse in the hair before you start just to create a foundation so the hair's not too slippery," Marjan says. She's a fan of Bumble and bumble's Thickening Full Form Mouse, TIGI Superstar Queen for a Day Thickening Spray, and Ouai Wave Spray. Once the hair is dry, before she goes in with an iron she'll spray Tresemme Micromist Level One all around because it "gives the hair more memory." Spray—from at least 12 inches away—above and below each section you're working with.
Don't forget about the roots.
"I'll spray the texture spray at the root, then go in with my hands and massage the roots because that breaks up any separation at the root from your sectioning," Marjan says. "Oribe Dry Texture Spray works great."
Use your fingers over a brush.
Marjan finishes with a small amount of Leonor Greyl Eclat Naturel smoothing balm pomade with her fingers or, sometimes, with a wide tooth comb. A brush, Marjan warns, flattens out the curls. "It would make [the curls] too fluffy," she says.


Comments
Post a Comment